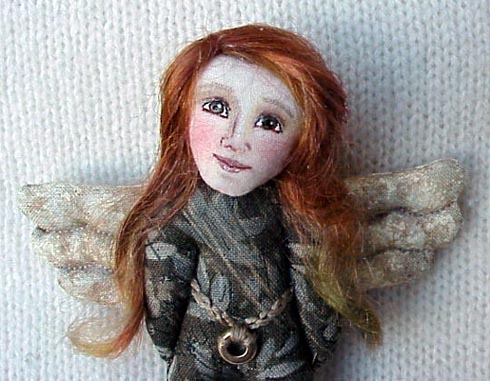
Free Pin Doll Pattern
This is an easy
3-piece pattern. Feel free to email me if you have any questions:
blueheron61@charter.net or blueherondolls@hotmail.com
As an
individual doll maker, you may make as many dolls as you like for pleasure or profit.
However, please acknowledge the designer on the doll and/or hangtag.
This pattern/doll is not to be mass produced, as in cottage industry.
Note: While I
welcome reciprocal links to related doll sites, this pattern may not be
uploaded to anyone else's website without my written permission. Thanks.
![]()
| Materials
Needed: Fabric scraps (woven) for body, wings, head Thread to match Plastic-backed freezer paper 1-1/2 inch pin back Doll Hair (mohair, fine yarn, wool locks, crepe wool, etc) Media to create face (your preference, or any combo): Colors - white, black, lip and eye colors Gel pens Acrylic paints and a very fine paintbrush Colored pencils Micron Pigma pen, size 005, brown &/or black Powder blush Fabric pen with disappearing ink (optional) Hot glue gun (hi or low temp) Beads and other doo-dads for embellishment (opt.) Hemostats for turning Your favorite tools for stuffing small things Basic hand and machine sewing supplies Clear acrylic spray fixative (like Krylon) Polyfil stuffing Hand-held blow dryer (optional) |
|
![]()
| Instructions: 1. Print the pattern, enlarge or reduce on copier to match the 1-inch rule. 2. Trace the pieces onto freezer paper & cut out just inside the drawn line. 3. Iron each pattern piece onto the wrong side of doubled fabric; pin in place to prevent shifting. 4. Sew completely around each piece, next to the paper edge. Use short stitch length. Peel pattern off (this paper can be reused). 5. Cut around the seamline, leaving a 1/16 to 1/8 inch seam allowance. Clip curves. 6. Make a vertical slit about 1/2 to 3/4 inch long on ONE side of the head. See illustration. Turn right side out. Stuff firmly and stitch closed. Set aside. 7. Make a vertical slit on ONE side of the body, about 1 inch long, centered, starting about 1/4 inch down from the seam at the neck stump. Turn right side out and fingerpress smooth and flat. Don't stuff yet! 8. Mark arm lines as illustrated: use a colored pencil or fabric pen with disappearing ink. Top stitch along these lines, secure thread ends. 9. Stuff body firmly, starting with the legs, then the arms, then the remainder of the body and neck stump. Hand-stitch closed. Apply any beading or other embellishment at this time. 10. Sew around the wing pattern and cut out, leaving a 1/16 to 1/8 inch seam allowance. Clip curves. Make slit on one side of the wings as shown and turn right side out. Finger press flat and smooth. Mark lines as illustrated, top stitch along these, securing ends. Stuff. Hand-stitch closed. |
11. Glue or stitch the wings to the back of the body. Glue or stitch the head to the neck stump. 12. Lightly spray the face area with an acrylic spray, allow to dry (this prevents ink from running). 13. (Now or later) glue or sew pin back onto the back of the wings. 14. Draw or paint face. See the illustration for an example. Remember, the eyes are about halfway between the top of the head and the chin. I use a very sharp colored pencil to sketch the placement of the features. Make a small half-circle shape for each eye, using a Gel pen or white acrylic paint. When dry, add the iris with a Gel pen or acrylic paint. I prefer to dip the head of a straight pen in paint, and lightly touch it to the eye to create a round iris. When dry, add the black pupil. When dry, dip the point of a straight pin in white paint and add the "highlights." Outline eyes with a Micron pen. Draw the nose carefully with a brown micron pen or colored pencil. Draw the lips with a Gel pen, allow to dry. Consider drawing a line with the Micron pen to separate the upper and lower lips. With a lighter lip color, highlight the lower lip. With a brown or gray pencil, add any shading to the face. Apply blush. Spray lightly once more with the acrylic sealer. 15. Glue or stitch a small amount of fiber for hair onto the top/sides of the head. Finger-style hair. Add any additional embellishments as desired. 16. You may make as many of these fairy pins as you like, but please acknowledge the designer. |
|
Copyright Deanna Hogan, Blue Heron Crafts